


The Setup
I recently switched internet service providers, from Comcast to WebPass. Comcast had been progressively upgrading our connection, and I honestly didn’t have any complaints, but WebPass is four times faster. Eight times faster, maybe? It’s so fast that I could demonstrate that my router hardware was the bottleneck and I needed to buy something physically capable of more bits per second. There’s gigabit Ethernet coming straight out of my wall, no modem required. So that’s exciting. The not-exciting part is that WebPass uses what is euphemistically called “carrier grade” NAT to deliver IPv4 service. This means I have no public IPv4 address at all.
This is exactly the grim meathook future that I predicted over a decade ago.
One interesting consequence of having no public IPv4 address is that I could no longer make inbound connections to my home network. When I’m roving around with my laptop, I like to be able to check in with my home servers. Plus, I’m like, a networking dude, or something, so I should know how this stuff works, and being able to connect to networks is a good first step to doing interesting things with them.
The Gear
I’m using OpenWrt (Chaos Calmer) firmware on my home router (although this also works on Barrier Breaker). If you configure its built-in IPv6 stuff naively, connecting to your home network is no problem at all! Every device on your network suddenly has its own public IP address on the Internet.
The Problem
In case it’s not clear: don’t do that. I can guarantee you that all of your computers and some things which aren’t obviously computers (game consoles, “smart” scales, various handheld devices, your “cloud” thermostat, probably your refrigerator, maybe some knives or guns that you didn’t know had internet access: anything that can connect to WiFi) are listening on a surprising array of ports, and every single one of them has some interesting security vulnerability which an attacker could potentially use to do bad stuff. You should of course keep your operating systems and device firmware updated to make sure you’ve always got the latest security patches, but even if you’re perfect at that, many devices simply don’t get updates. So the implicit firewall that NAT gave us is still important; except now we need it as an explicit firewall that actually blocks traffic, and not as an accident of the fact that devices don’t have their own externally-available addresses.
The Requirements
Given these parameters, the desired state of my router (and, I hope, some of yours) is:
- Explicitly deny all inbound IPv6 connections to all devices that aren’t expecting them, such as embedded devices and laptops.
- Explicitly allow all inbound IPv6 connections to specific devices and ports that are expecting them, like home servers.
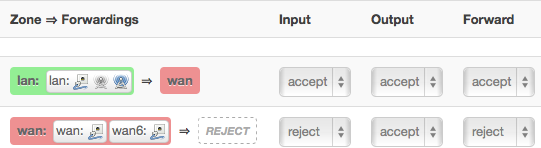
Casual Difficulty: Rejecting Incoming Traffic
OpenWrt has a web interface, called “LuCI”, which has a nice firewall configuration application. You’ll want to use it to reject IPv6 inputs, like so:
It also has a “port forwarding” interface, but forwarding a port is something that only really makes sense in an IPv4 NAT scenario. In an IPv6 scenario you don’t need to “forward” since you already have your own address. Accordingly, the interface populates the various IP address selectors with only your internal IPv4 addresses, and doesn’t work on IPv6 interfaces on the router.
Now we get to the really tricky part: allowing inbound traffic to that known device.
Normal Difficulty: Home Server Naming
First, we need to be able to identify that device. Since residential IPv6 prefix allocations are generally temporary, you can’t rely on your IP address to stay the same forever. This means we need to have some kind of dynamic DNS that updates periodically.
Personally, I have accomplished this with a little script using Apache libcloud that I have run in a crontab. The key part of that script is this command line, which works only on Linux:
1 | |
that enumerates all globally-routable IPv6 addresses on a given interface
(where the interface is br0 in that script, but may be something else on your
computer; most likely eth0).
In my crontab, I have something like this:
1 2 | |
And I ran the script once manually to initialize the keyring entry with my API key in it.
Note: I would strongly recommend creating a restricted user that only has access to DNS records for this, if you’re doing it on a general cloud provider like Rackspace or Amazon. On Rackspace, this can be accomplished by going to the “Account” menu at the top right, “User Management”, “Create User”, and selecting the “Custom” radio button in the “Product Access” section. Then, log in as that user, go to the “Account Settings”, and copy the API key.
Nightmare Difficulty: ip6tables suffix matching
Now we can access the address of home.mydomain.example.com from the public
Internet, but it doesn’t do us much good; it’s still firewalled off. And since
the prefix allocation changes regularly, we can’t simply open up a port in the
firewall with a hard-coded address as you might in a regular data-center
environment.
However, we can use a quirk of IPv6 addressing to our advantage.
In case you’re not already familiar, let me briefly explain the structure of IPv6 addresses. An IPv6 address is a 128-bit number. That is a really, really big number, which means a really, really big set of addresses; unlike IPv4, your ISP doesn’t need to jealously hoard them and hand them out sparingly, one at a time.
One of the features of IPv6 is the ability to allocate your own individual addresses. When your provider gives you an IPv6 address, they give yo a so-called “prefix allocation”, which is the first half or so - 64 bits - of an address. Devices on your network may then generate their own addresses that begin with those 64 bits.
Devices on your network then decide on their addresses in one of two ways:
- If they’re making an outgoing connection, they choose a random 64-bit number and use that as the suffix; a so-called “temporary” address.
- If they’re listening for incoming connections, they generate a 64-bit number based on their Ethernet card’s MAC address; a so-called “primary” address.
It is this primary address that the above ip command will print out. (If you
see two addresses, and one starts with an f, it’s the other one; this post is
already long enough without explaining the significance of that other address.)
Within iptables, the --source and --destination (or -s and -d) matching
options are documented as having the syntax “address[/mask]”. The “mask”
there is further documented as “... either an ... network mask (for iptables)
or a plain number, specifying the number of 1’s at the left side of the network
mask.” Normally, sources and destinations are matching network prefixes,
because that’s what you would normally want to allow or deny traffic from: a
prefix representing a network which in turn represents a specific group of
computers. But, given that the IPv6 address for an interface on a given
Ethernet card with a given MAC address will have a stable suffix derived from
that MAC address, and a prefix who changes based on your current (dynamic)
prefix allocation, we can write an ip6tables rule to allow connections based on
the suffix by constructing an address that has a mask matching the last 64
bits of the address.
So, let’s say your ip command, above, output an address like
2001:1111:2222:3333:1234:5678:abcd:ef01. This means the stable part of your
address is that trailing 1234:5678:abcd:ef01. And that means we want
iptables to allow inbound traffic to a specific port. To allow incoming HTTPS
on port 443, in the OpenWRT control panel, go to Network → Firewall, click the
“Custom Rules” tab, and input a line something like this:
1 2 3 4 5 6 | |
This says that we are going to append to the forwarding_rule chain (a chain
specific to OpenWRT),
a rule matching packets whose destination is our suffix-matching mask with
the suffix of the server we want to forward to, for the TCP protocol using the
tcp matcher, whose destination port is 443, giving it a comment of
“Inbound-HTTPS” so it’s identifiable when we’re looking at the firewall later,
sending it out the br-lan interface (again,
somewhat specific to OpenWRT),
and jumping to the ACCEPT target, because we should let this through.
Game Over
Congratulations! You can now connect to a server on a port, in the wonderful world of tomorrow. I hope you look forward as much as I do to the day when this blog post will be totally irrelevant, and all home routers will simply come with a little UI that lets you connect a little picture of a device to a little picture of a cloud representing the internet, and maybe type a port number in.